BIZZ WIZZ ORDERING
Barcode Print List , View Order , Edit Order , Select Stock
Bizz Wizz : Setup , Main Menu , Ledger , Phone Book , Invoice Book , Stock Book , Order Book , Creditors , Point of Sale , Business Name , Diary , Wages , Document Manager , Unlock , Backup
See Also : Orders Main Menu , Order List , Suppliers List , Add and Edit Suppliers , Sales Purchase , View / Edit Order , Fill Order , Bar Codes List
NOTE: By moving the mouse over the buttons, the help box at the bottom of that screen will give you a brief description of the function of that button.
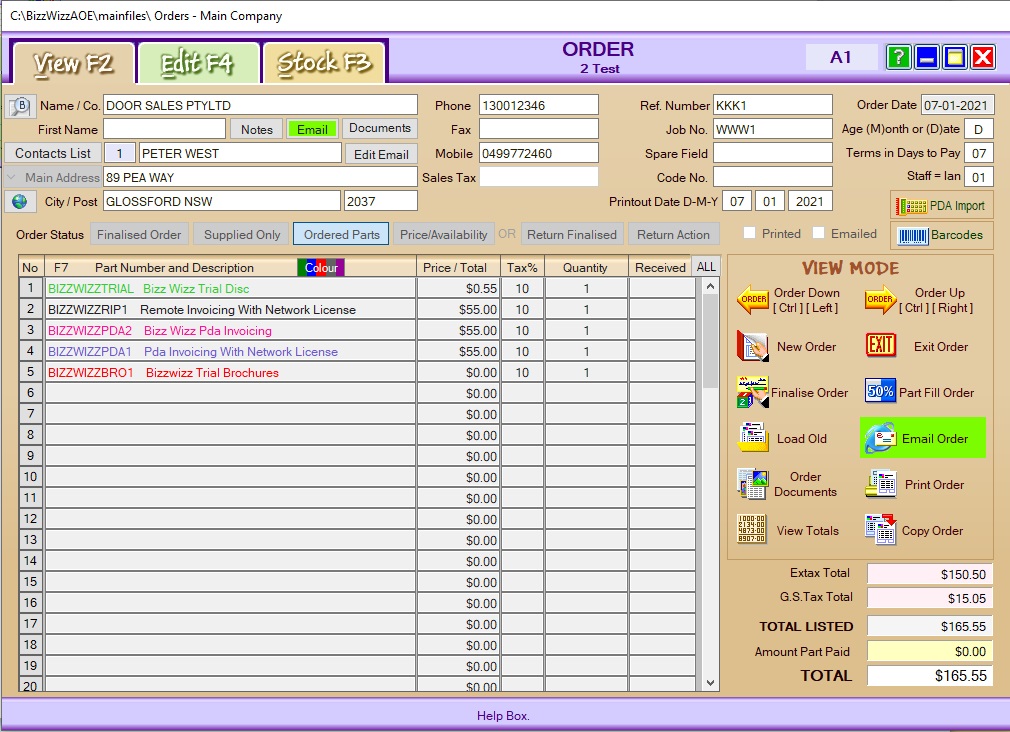
The Order Top is made up of three tabs. View mode,
Edit mode and Stock mode.
View Mode
This mode allows us to view Orders and flick up and down between them.
Each mode has it's own set of buttons on the right hand side of the screen.
Also each screen has a variety of options that can be selected. In the
grey section on the top of the Order you will see the name of the client, the
account number and the Order number.
Next we have the client's details, name , address, phone number etc. Below
this information we have which address to use, the payment status and the print
or email status.
The mailing address and the delivery address can be selected for printing with
these options.
Order status: An Order can have several classifications, either
Filled Order, Supplied Only, Ordered Parts, Price & Availability, Return Credited, Return Action. One of these options is normally set when creating
the Order, however the status can be changed.
Print Status: The print status shows whether the Order is printed
or emailed or not. These are set automatically when the Order is printed
or emailed.
You will also notice next to the first name input box the Supplier client
Notes, Email
and Document buttons. These buttons relate to the supplier not the
Order.
PDA Import button : This button is to Import items into an
order from a CSV File or TAB delimited File normally from a PDA hand held
device.
NOTE: the Stock file in BizzWizz must be selected prior to Importing. The
CSV file must hold 2 fields part/barcode and Quantity. If a part being imported
is not found in the stock file a new CSV file will be made holding non-found
items. You may need to add these part manually.
Barcodes button : See
Bar Codes List.
View Mode Buttons:
Order down and Order up buttons allow you to scroll up or down
through your Orders.
Fill Order button allows you to pay an Order through to the
Creditors or Ledger.
New Order button allows you to create a new Order.
Part Fill Order If you enter the items supplied, the Order can then be
Part filled and the transaction sent to Creditors or Ledger.
Load old button Clicking on this button allows you to load a
previously written Order.
Email Order Emailing of Orders can be done in three different
ways. One is to email via HTML, another is to email a PDF and the third
way is XML.
When the email button is pressed a small options menu will appear. Select
which option suits your application. Please note if you wish to preview
the PDF or access files created the two tick boxes at the bottom of the options
menu will need to be ticked.
Order documents button allows you to view the document manager and
attach documents to the Order.
Print Order button allows you to print out the Order as per the
Order layout.
View totals button. This allows you to view totals behind these buttons.
Copy Order button. By clicking on this button you can copy the
Order to the next available free Order.
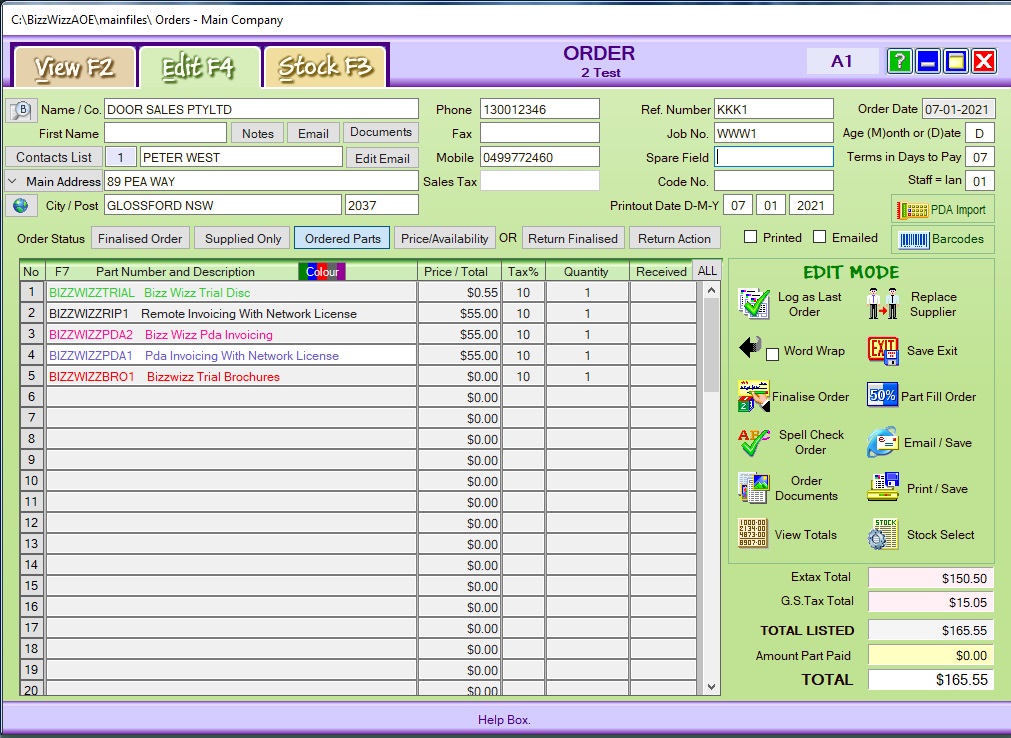
Edit mode The edit mode window is shown
above.
In this mode you can change the client's details and options. The bottom of the
Order is now activated as well. If you already have your client's
details in the top of the Order, then click on one of the fields in the
The Colour Button will let you set the colour of the line your currently on
and if you have a colour printer it will print as well.
Note: the Font for the base Order text can be changed in [ Print Layouts ]
You can now enter a description into the Invoice bottom of goods sold or
services rendered.
Order bottom and the field will be highlighted in white.
You can now enter a description into the Order bottom of items to be Purchased.
Please note the help box at the bottom of the screen when moving the
mouse over the
DESCRIPTION field.
The help box will show the keys you need to press to get editing
functions :
[Ctrl] [P]
= will [ Paste ] a block of text into the Order description boxes from the
windows clipboard.
[Ctrl] [G]
= will [ Get ] a block of text from a line to another line. Note: you will
be asked for the line numbers.
[Ctrl] [F]
= [ Find ] stock mode OR F3 stock.
[Ctrl] [B]
= will [ Blank ] the line.
[Ctrl] [Del]
= will [ Delete ] the line and move rest up 1 line.
[Ctrl] [Ins]
= will [ Insert ] a line in front of the current line.
[Ctrl] [F]
= will set this line as [ Freight ] so it will show in the Freight totals
Please note the help box at the bottom of the screen when moving the
mouse over the description field.
Press enter or tab to highlight the price column and enter the cost price.
By clicking on the letter "C" or the letter "X" after the amount ie 110c this
will automatically take one eleventh off the price and insert 10 into the Tax
column.
Highlight the Tax percent column, if the default 10% has been entered in set up
then just hit enter and 10 will automatically be inserted, if not you may have
to type the 10 into the column.
The quantity column can only have a number for the quantity entered first, you
can then all letters after the number, such as "L" for length, "M" for meters
etc, eg 35m.
The Received column is used to enter the number of received items to part
fill Order.
PDA Import button : This button is to Import items into an
order from a CSV File or TAB delimited File normally from a PDA hand held
device.
NOTE: the Stock file in BizzWizz must be selected prior to Importing. The
CSV file must hold 2 fields part/barcode and Quantity. If a part being imported
is not found in the stock file a new CSV file will be made holding non-found
items. You may need to add these part manually.
Barcodes button : See
Bar Codes List.
ALL Button is found above the scroll bar this button lets you tag
all item received or un-received have a play to see just how it works.
Buttons on the right of edit mode are:
last Logged Order button. This button records this Order as the
last Order for this client and also logs the date into the Suppliers record.
This function can be set automatically when creating a new Order.
Replace Supplier button. If you select the wrong Supplier for the top
of the Order you could go to the top if the Order and change the details
except this would not work because it will not change the Supplier number. With an
Supplier the details must be
replaced with this function. When the button is pressed the Supplier list
will show, select or add the correct Supplier, click on select and the details
will be changed to the new or correct Supplier.
Fill Order button. This button allows us to pay or part pay the Order
through to the Ledger. See Fill Order
Part Fill Order If you enter the items supplied, the Order can then be
Part filled and the transaction sent to Creditors or Ledger.
Exit & Save button. Click this button to save changes to the
Order and return to view mode. This can also be done by clicking on the
view tab.
Word wrap button. If the tick box on this button is ticked then as you
type the description the text will automatically word wrap to the next line only
if the next line is blank.
Spell check Order button. This button will spell check the
description section of the Order. Please note when typing the
description each word is spell checked when typing and a beep and a red line may
be seen when leaving the word. By right clicking on the word you can
access the spell checker. The red line will disappear when you
commence the next word.
Email/Save button. Emailing of Orders can be done in three
different ways. One is to email via HTML, another is to email a PDF and
the third way is XML.
When the email button is pressed a small options menu will appear. Select
which option suits your application. Please note if you wish to preview
the PDF or access files created the two tick boxes at the bottom of the options
menu will need to be ticked. The Order is also saved.
Order documents button allows you to view the document manager and
attach documents to the Order.
Print Order button allows you to print out the Order as per the
Order layout. The Order is also saved.
View totals button. This allows you to view totals behind these buttons
Stock Select button. Clicking the Stock Select button is the same
as clicking the stock tab at the top of the screen or the F3 button on the
keyboard to enter stock mode.
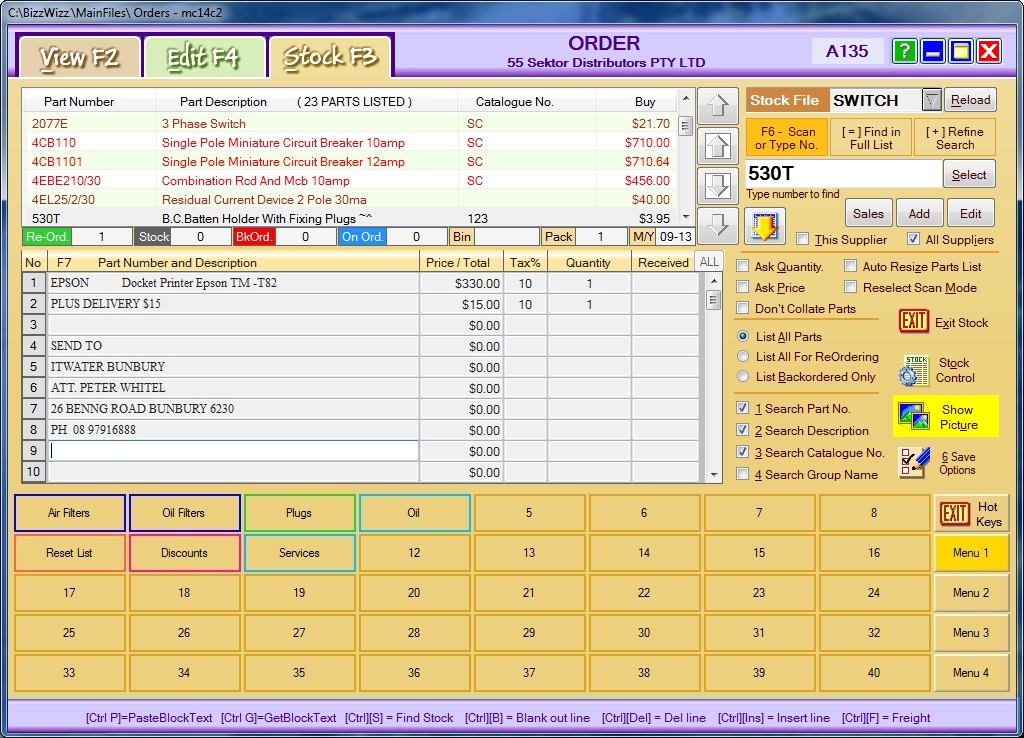
Stock mode
The Stock mode is shown above.
Before doing anything you need to set the stock file that you are selecting
parts or items from. This is done in the top right hand corner of the
screen.
F5/Stock File. To select a file hit F5 on the key board
or the triangular shaped down arrow in the file name box. This will drop
down a list of available stock files. if you do not have any stock files
then you will need to create one in the Stock book program.
Double click on the selected file name and the stock file
will load into memory. You are now ready to barcode, search and/or select
parts/ items to the Order.
Reload button Stock is stored in memory. If changes have been made
whilst you are in Ordering these changes can be implemented by pressing the
reload button
Select a blank line in the bottom of the Order, if you do not do this the
program will automatically select the next blank line. Click on the scan
button or press F6 and you are ready to bar code scan. If you do not have
a bar code reader you can just type the number into the white box and/or select
from the stock list.
[=] Find in full list button. This button can be used quickly by just
typing [=] and the description of what you would like to list, eg [=] plug, will
list all the words with the word plug in it. You can now select the
correct one from the list.
TIP, just pressing the up and down arrow key will select the list.
Pressing the right arrow will return you back to the search box from the list.
[+] Refine search button. This button will search only the items
currently in the list refining the search. This mode can be used quickly
by just typing [+] and the description of what you would like to list, eg [+]
plug, will list all the words with the word plug in the list. You can now select
the correct one from the list.
Stock Options This Supplier, All
Suppliers, These options should be selected
to
Search only parts for this Supplier.
Sales Button will show sales for the selected part so you can work out
what to reorder.
Add Button and Edit Buttons Let you add or edit parts in stock
without loading the Stock Program
Ask Quantity, Ask Price. These
boxes can be ticked to invoke these options when selecting a part/item,
Auto resize part List When focus is on the parts list the list will
resize to its maximum height, unless there is only a few items in the list.
When the list is de selected it will reduce in size.
Reselect Scan mode option After selecting a part
with this option ticked, scan mode will be automatically re selected and the
cursor in the box waiting for bar code
Search Options The top three option are, List all Parts, List
All for Reordering and List Backordered Only. With these
options only the Parts that meet the selected options will show.
For options 1 to 5 tick the
relevant options required to find Data.
Exit Stock button returns you to edit mode.
Edit Stock button This button will return you to
edit mode and automatically load the stock program so you can add/edit
parts/items.
Show Picture button When a part/item in the list
is highlighted and this button turns bright yellow, it indicates that the
picture for this part/item is available
Save Options button This will save the stock
options as you have set them.
Always Show Hot Keys When this button is ticked on, the hot keys will
be displayed when you first enter stock mode. Right
click on hot keys to set up.
Hot Keys button By clicking on this button the
hot keys will show.
See Also : Orders Main Menu , Order List , Suppliers List , Add and Edit Suppliers , Sales Purchase , View / Edit Order , Fill Order , Bar Codes List