Barcode Print
Bizz Wizz : Setup , Main Menu , Ledger , Phone Book , Invoice Book , Stock Book , Order Book , Creditors , Point of Sale , Business Name , Diary , Wages , Document Manager , Unlock , Backup
See Also : Stock Main Menu , List Parts , Hot keys , Add Stock , Import Stock , Print Barcode , Part Build
Allows you to print a barcode for individual stock items
HOW TO USE THE BARCODE BUTTON
Click on the stock item that you want to print a barcode for.
Click on the [BARCODES] button from the bottom row of buttons in the list screen.
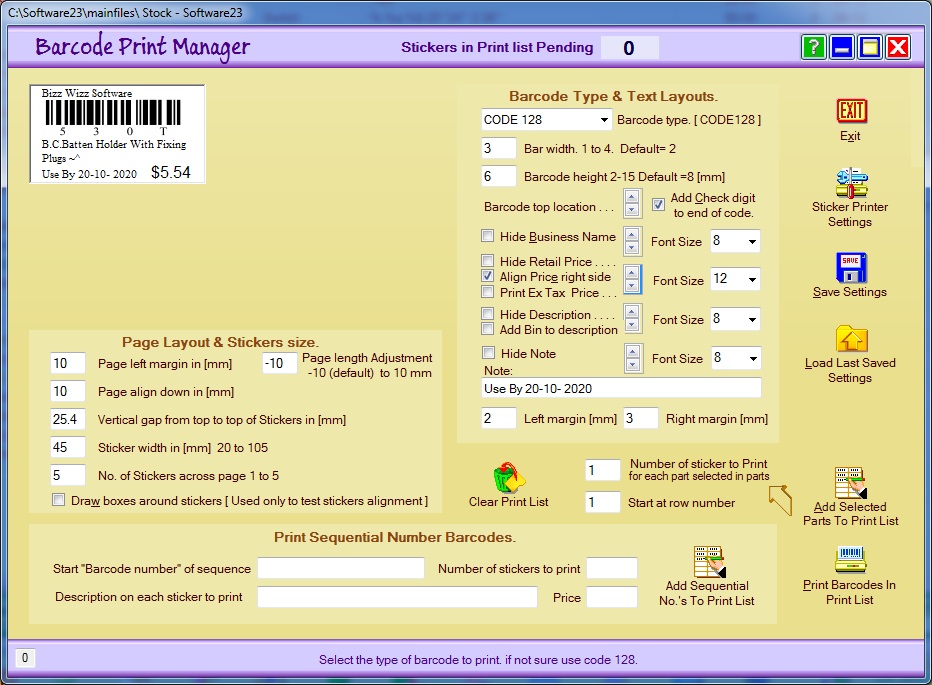
The BUTTONS on the right hand side of the screen are:-
EXIT - Click on the [EXIT] button to leave this menu
SAVE SETTINGS - Click on the [SAVE SETTINGS] button to save your settings on this menu
LOAD LAST SAVED SETTINGS - Click on the [LOAD LAST SAVED SETTINGS] button to reload your last saved settings
ADD SELECTED PARTS TO PRINT LIST - Click on this button to add the
selected stock item to the barcode print list.
The print list is a buffer that holds the sticker until you have
enough to print on the page.
PRINT BARCODES IN PRINT LIST - Click on the [PRINT BARCODES IN PRINT LIST] button to print the list barcode and the print menu comes up you choose to print, select a different printer, export the barcodes or view them on the screen with the same print options again from the view screen.
CLEAR PRINT LIST - Click on the [CLEAR PRINT LIST] button to clear your print list.
BARCODE SETUP
Barcode Type & Text Layouts Box
BARCODE TYPE - A selection of different codes that the barcode scanner can read. Common codes used are Code 128 for text and numbers and EAN13 for thirteen (13) numbers must use 13 numbers.
BAR RATIO WIDTH - You are able to make the barcode vertical bars thinner or thicker but the default selection is 3.
BARCODE HEIGHT - A range from 2mm to 15mm is available but the default height is 8mm
BARCODE TOP LOCATION - Click the up or down arrows to place the barcode where you want it on the view screen in the top left hand corner.
HIDE BUSINESS NAME - Click the check box next to this selection and you will hide your company name, you can also move the business name up and down using the arrows keys next to it, you can also change the font size .
HIDE RETAIL PRICE - Click the check box next to this selection and you will hide your retail price
ALIGN PRICE RIGHT SIDE -
Click the check box next to this selection and you will move your price to the
right hand side of the barcode, you can also move the price up and
down using the arrows keys next to it, you can also change the font size.
PRINT EX TAX PRICE - The ex tax price will print
to four decimal places if the amount is calculated to four places. If
amount is in whole dollars and cents it will only print to two decimal places.
HIDE DESCRIPTION - Click the check box next to this selection and you will hide your stock item description, you can also move the price location up and down using the arrows keys next to it, you can also change the font size.
HIDE NOTE - Click the check box next to this selection and you will
hide Note Text
The note can be used just as a note on the sticker or as a Use By Date or
Keep Refrigerated .
LEFT MARGIN - Type in the mm that you want the left margin to move the barcode over
RIGHT MARGIN - Type in the mm that you want the right margin to move the barcode in
No. OF STICKERS TO PRINT - Type in the number of stickers to print for each part that you have selected
START ROW NUMBER - Type in the row number to start printing from on the page of stickers
Page Layout & Stickers Size Box
PAGE LEFT MARGIN -
You can align the sticker page in millimeters
PAGE LENGTH ADJUSTMENT - This box is used
when a page feed may not let the next sticker print because it senses the end of
the page, or too many stickers are printed on the page.
This can happen with single sticker printers.
PAGE ALIGN DOWN - You can align the sticker page down in millimeters
VERTICAL GAP - Is the measurement from the top of the sticker page to top of the first row of stickers in millimeters
STICKER WIDTH - The width of the sticker in millimeters NB: When you change the size the viewing screen will also adjust to that size.
No. OF STICKERS ACROSS PAGE - How many stickers you have on the page 1 to 5 stickers.
DRAW BOXES AROUND STICKERS - Use only to test stickers alignment
Print Sequential Number Barcodes
This function is used when you want the barcodes to be different but the description and price is the same.
START BARCODE No. OF SEQUENCE - Type in your start barcode number then it will print in sequence number by the faction of one from that number
No. OF STICKERS TO PRINT - Type in the number of stickers you wish to print
DESCRIPTION - Type in your description that will be printed on each sticker
PRICE - Type in your price that will be printed on each sticker
When there is more than one stock item to be placed in the print list the steps are as follows - Click on the stock item then click on the [BARCODES] button, type in your settings if they are not already done then click on the [ADD SELECTED PARTS TO PRINT LIST] button then click on the [EXIT] button and repeat the steps again for how many stock items you want to place on the print list.
NB: On the top of the barcode menu the count of how many stickers are in the pending print list is displayed.
See Also : Stock Main Menu , List Parts , Hot keys , Add Stock , Import Stock , Print Barcode , Part Build