Bizz Wizz : Setup , Main Menu , Ledger , Phone Book , Invoice Book , Stock Book , Order Book , Creditors , Point of Sale , Business Name , Diary , Wages , Document Manager , Unlock , Backup
See Also : Creditors , List all Suppliers , Add New Suppliers , List Bills , Add and Pay Bills
NOTE: By moving the mouse over the buttons, the help box at the bottom of that screen will give you a brief description of the function of that button.
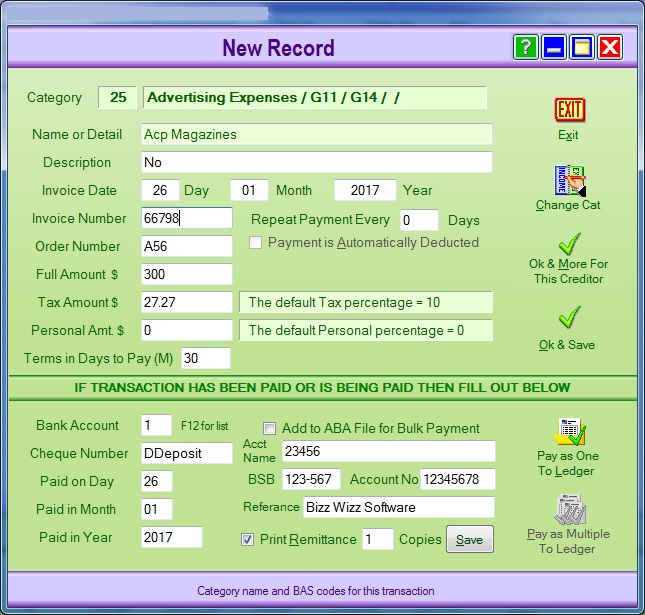
Please note that the picture below is the same format for:
New Record
Pay Record
Change Record.
You are on the [New Record], [Pay Record] or [Change Record] page.
If you are on the [New Record] page, the Category
number will already be listed in the top left Category field. You need to enter the
details required for each field.
Repeat payment every ? days is if the payment is paid every week, month or
part of valid numbers are 7,14,21,30,60,90,....360.
Payment is automatically deducted can be used if repeat day are set. This
will send the payment to the ledger automatically.
The Invoice Number and/or Order Number is
located on the Invoice you received. Enter these numbers in the [Invoice Number]
and/or [Order Number] field. You need to enter the total amount of the bill in
the [Full Amount] field and the GST amount is entered in the [Tax Amount] field.
This field already has a [c] in it. If you press the [c] on your keyboard it
will automatically enter [The default Tax percentage = 10%]. If any amount
of this bill is for personal use, you need to work out what percentage is
personal. This amount is entered in the [Personal Amount] field. This
field already has a [c] in it for if you have already entered your personal
percentage amount when you first created the Expense Category. If you have done
this then press the [c] on your keyboard and it will automatically enter [The
default Personal percentage = %]. If you don't want to have the percentage as a
default, then all you need to do is enter the $ value for the [Personal Amount]
field.
If you are on the [Pay Record] page, please refer to
the [Pay to Ledger] notes below.
If you are on the [Change Record] page, you can edit the changes required for that Supplier and then click on the [Ok & Save] button. You MUST NOT part pay while on the Change Record page.
The [Change Category] button allows you to go back to the Expense Category Groups to add a new Expense Group or to make any changes needed to an existing Expense Group.
The [OK & More For This Creditor] button allows you to go to a new New Record for the same Expense Group, if you have more than one Tax Invoice from the same Supplier, as well as saving the information you have just entered for the first Tax Invoice.
The [OK & Save] button allows you to save the information you have just entered into the New Record.
The bottom half on the New Record page [If Transaction has
been paid or is being paid then fill out below] allows you to pay one or
more Transactions.
The [Bank Account] field is where you enter the number of the
bank account that you want the Transaction paid from. You will need to set up
your bank accounts in the Ledger. You can then choose which bank account
you will pay the Invoice from. If you click on the Bank Account field, it will
list all you bank accounts in the drop box next to it. Enter the correct bank
account in the [Bank Account] field.
The [Cheque Number] field is for when you
enter how you are paying the Transaction. When you click on this field it will
open a box that shows you different options. If you are paying by cheque
you need to enter the cheque number in the blank field. If you are paying by
cash you leave the field blank, C is for paying by credit card, E is for Eftpos,
D is for Direct Deposit etc. The Direct Deposit option when (Enter key) is
pressed will show Boxes for an account name, BSB Number, account
Number and Reference field which is fill automatically but can be changed if
needed. These are used for adding the payment to an ABA file. for doing bulk
payments to your web Bank.
The [Paid on Day] field will automatically have the day entered.
You can change this day by clicking on and highlighting the default day.
The
[Paid in Month] field will automatically have the month entered. You can change
this month by clicking on and highlighting the default month.
The [Paid in Year]
field will automatically have the current year entered. You can change this year
by clicking on and highlighting the default year. If you tag the Print
Remittance button, then it will automatically be printed when you click on [Pay
As One To Ledger].
Next to the Print Remittance field, you can also enter the number
of copies you want printed.
The [Pay As One To Ledger] button will automatically pay the
Transaction through to the Ledger. However, if it is only a part payment you
need to change the dollar amount in the Full Amount field. NOTE tick Print
Remittance if you need print a remittance and set number of copies and save
before you [pay to ledger]
If you have clicked pay and Print Remittance
is ticked, then a Print Menu pop up box will open. If you already have your printer
set up click on [Print] to send the Paid Transaction straight to the printer. If
you need to choose a printer option then click on [Print To] which will bring up
your printer options. Choose the printer you would like to send the Paid
Transaction to and click on OK. If you click on [Export] the [Select Format]
page will open. You can choose from PDF ADOBE, HTML, WORD, JPEG or EXCEL. Click
on your chosen option and follow the prompts.
The [Pay As Multiple To Ledger] button will work like 'pay as one ' but
each bill is send to the ledger as a transaction.
The [Save] Print Setup button will save the printing setups that you have entered to the left of that button.
See Also :
List all Suppliers , Add New Suppliers ,
List Bills , Add and Pay Bills