Add Stock
Bizz Wizz : Setup , Main Menu , Ledger , Phone Book , Invoice Book , Stock Book , Order Book , Creditors , Point of Sale , Business Name , Diary , Wages , Document Manager , Unlock , Backup
See Also : Stock Main Menu , List Parts , Hot keys , Add Stock , Import Stock , Print Barcode , Part Build
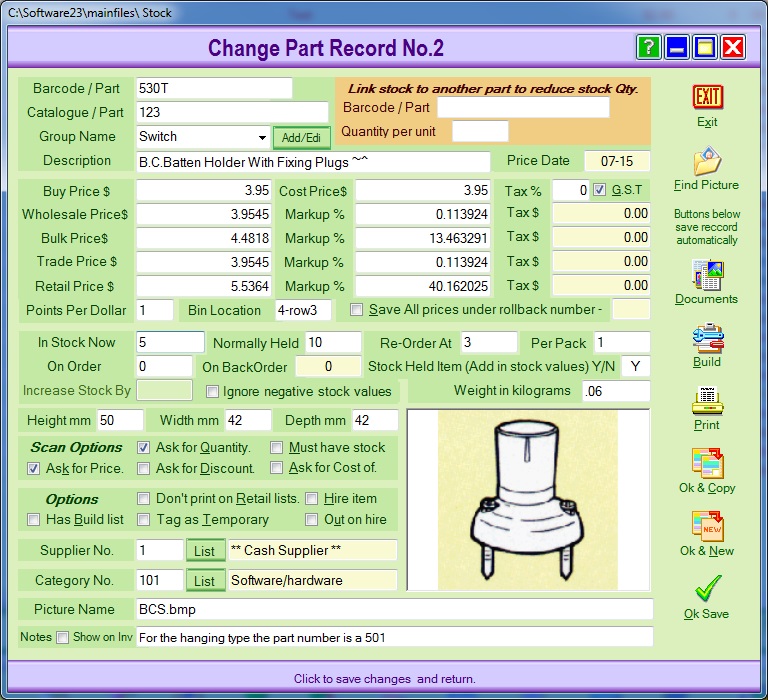
INPUT A NEW PART OR CHANGE A PART:
Barcode / Part Number is the placed in this box. If the part has both,
the barcode takes preference and the part number can be put in the
Catalogue number box.
However if the part has a Catalogue Number then put the Part Number in the
Description box.
NOTE : putting a "-" at the end of the part or barcode the ask price box
in pos will be negative with 0 amount value. (Good for pay outs )
Catalogue Number is the suppliers number in there catalogue
Group Name is a name used to find all parts in a group.
Use the drop down arrow to change a pre defined group name. Select one of
the XXX from the list, then after selection press the Add/Edit button to
change the XXX's to your desired pre set name.
Description field is the description of the Part.
Do not type in [ ~ ^ ] (older versions used symbols and are no longer used)
NOTE :The description field can also be used to jump
to a different
part number by placing a [ % ] sign at the beginning of the of the box ,
then one space, then the part or barcode
number you wish to jump to and select.
Price Date is the date of the last price change or update.
The Orange box is to link 1 part to another part . This is used
mainly for packs ie. a pack of 12 Cans. The barcode on the pack is for 12
Cans.
Each Can has a barcode for 1 Can. You can enter the pack details,
then link to the Can barcode No. and set a quantity of 12 in the Quantity per
unit box.
You can also use the link if you have two barcodes for the one part ie.
two brands same item.
Buy price is the price you buy the part for ex-tax.
Cost Price is the buy price plus Freight and or any other expense.
Tax% type in the tax rate number only and tick if using GST and not
sales tax.
The next 4 rate boxes:
You can enter your selling prices OR just enter a markups. The price box
will work out the markup or the markup box will work out the sell price
Tip if you work with Ex-tax prices remove the tax rate and put if back after you
have set the prices.
Points per dollar is used for loyalty points.
Bin Location is were to find the part on the shelf.
Save all prices under rollback number Ticking this box will save the
current pricing so it can be Rolled back.
In Stock Now is the amount of stock you have now.
Normally Held is the amount of stock normally held.
Re-Order At is the low level of stock
Per Pack is the number of items in 1 pack.
On Order is pre set by the Order Book Program and holds the number
On Back Order is by invoicing and should not be changed unless wrong.
Stock Item has a "Y" or a "N" to state if this is a stock item.
Increase Stock By is only used when adjusting stock Quantities.
Tick the Ignore Negative Stock Value if you wish your stock to not go into
negatives
Weight and Size of the part are set in Kg and mm.
NOTE: Weight and Cubic can be reset in the list by putting a negative in
front of the value EG: -10 when adding a part to the Stock book.
This
will reset the total to EG: -10 to 10 in invoicing
This
can be used when you have a number of parts going in a carton (box) so you will
set the carton size to negative numbers and select the box from your stock last
on an invoice.
Scan Options: are used when Barcode Scanning part to ask for info.
Option: are to store info about the part.
Supplier No. click on the LIST Button and select the Supplier.
Category No. click on the LIST Button and select the Category.
Picture Name holds the name of the Picture and the Path.
Use the Find Picture Button to set the Path and Picture.
The Documents Button lets you Attach Document files to this part.
The Build Button let you start a build list for this part.
The Print Button will Print this parts details.
The Ok & Copy Button Saves the part and starts a new part with the same
details, its good if one parts red and another is green.
All you need to change is the color and the part number.
The Ok & New Button Saves the part and starts a new part with the NO
details.
The Ok Save Button Saves the part and returns .
See Also : Stock Main Menu , List Parts , Hot keys , Add Stock , Import Stock , Print Barcode , Part Build