BIZZ WIZZ PHONE BOOK
ADD /EDIT CONTACTS
Bizz Wizz : Setup , Main Menu , Ledger , Phone Book , Invoice Book , Stock Book , Order Book , Creditors , Point of Sale , Business Name , Diary , Wages , Document Manager , Unlock , Backup, Memo
See Also : Phone Book , Add Contacts , Print Stickers , Import Contacts
NOTE: By moving the mouse over the buttons, the help box at the bottom of that screen will give you a brief description of the function of that button.
NOTE: ADDING AND EDITING can be
done from here but we recommend that accounts are added from Invoicing and
Creditors or Orders! because not all field are shown in input window.
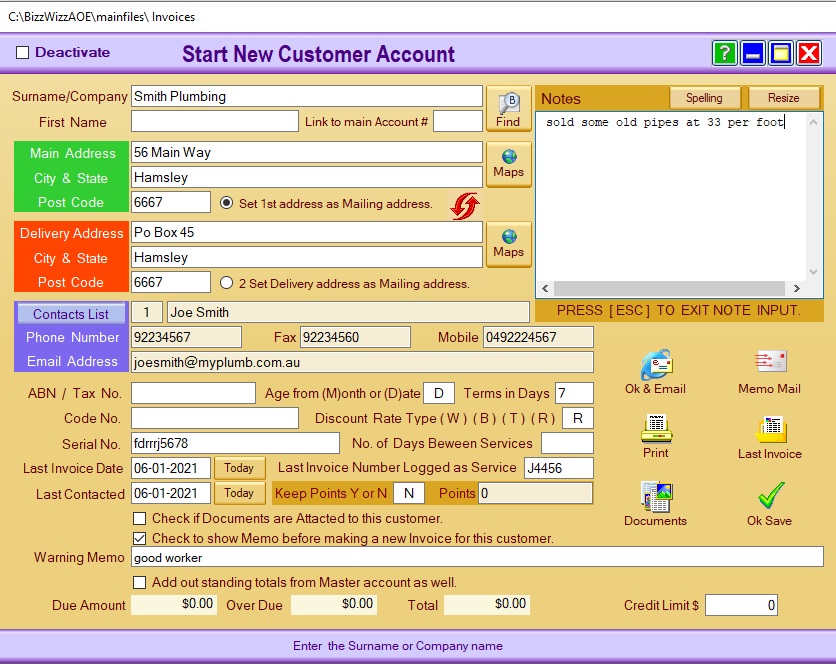
Deactivate - will hide this account in all the list screens.
Enter the surname or company name of the Supplier or Customer.
If you are using a company name leave the first name box blank, and put the
contact name in the contact box
If you are Entering a Suppler the [Pay Account Link] tick box will
be seen, and a input box for a Account No .
When ticked payments will be paid to this linked account
OR
If you are Entering a Customer the input box for the Statement to Account
No .will show (All invoices for this customer will show on that accounts
statement)
There is two address fields, you do not need to utilise both address
fields but the first must be used. There is also the option to set the [First address] or the [Second address] as the Mailing address.
You Must Tick on the
address that you want all corresponding mail sent to.
The two arrows button in red,
next to the first address options allows you to swap between the first address
and second address option.
CONTACTS Button
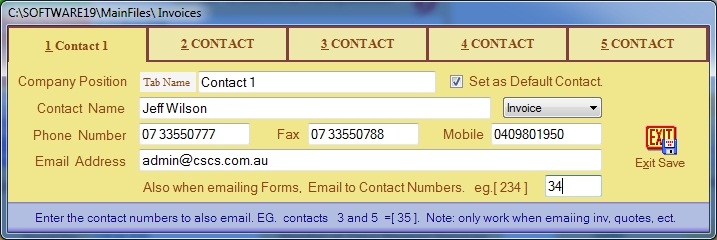
Five lots of contacts can be stored
Default Contact Option -You can set one contact as the default if you don't
want it to change.
Set For Printout Type Dropdown box - In some sections a contact
can be set to a Invoice type eg. Invoice, Quote, job ect.
Press Exit Save to return
Enter the rest of the detail on this Contact, down to the ABN or Tax number
Terms in days is set at a default of 7 days. You can change this to what is
suitable for your business.
The next
area reads Age from (M)onth end or (D)ate of Invoice. If you enter D for Date,
then any Account contact will automatically age overdue after 7 days.
If you enter M for Month, then any Account for that contact will
automatically age overdue 7 days from the end of the month.
If you are Entering a Customer the Discount Rate box will show enter the rate
for this customer ie. W=Wholesale B=Bulk T=Trade
R=Retail
OR
If you are Entering a Suppler the [Account No.] field is where you enter your account number that the Supplier
has allocated to your business.
There are two blank fields that
you can use as a Code or Spare field, that are located under the [Terms in Days]
field.
These fields can be rename in setups
If there is no [Last Order/Invoice Date] just click on the [Now] button to insert the
current date automatically.
The last Invoice or Order Number is pre set in Invoicing or Orders
If you are Entering a Suppler the [Balance] field will automatically be entered
by creditors software.
OR
If you are Entering a Customer the Keep Points box will Show. If you
wish that customer to get Loyalty Points then put a Y in the box. The
Points box shows total points.
The [Memo ]. You can enter any memo note applicable. If you tag on [Check to
show Memo when contact is selected for new transactions]
There is a box at the top right of the page for
[ Notes]. You can enter any notes applicable to that Contact.
If you
click on the [Resize] button at the top of the Notes, the box will
enlarge. You can press [ESC] to
exit the Note box or just click on any other section of that page, eg [Ok Save]
if you are ready to exit the account page.
Documents- Click on the [Documents] button to open the Documents Manager
page.
Email- Click here to open the page to send an Email
to the selected Supplier.
Print- A Print Menu pop up box will open to print suppliers details.
Memo- Sends a memo to a user on the network automatically putting the
customer details in the memo.
The [OK & Save] button allows you to save the
information you have just entered into the New Record. If you do not [Ok &
Save] then any information you have entered or edited will not be saved.