Bizz Wizz : Setup , Main Menu , Ledger , Phone Book , Invoice Book , Stock Book , Order Book , Creditors , Point of Sale , Business Name , Diary , Wages , Document Manager , Unlock , Backup
See Also : Wages Menu , Employee List , Pay Run , Input Employees & Adjustments , List Pay Runs
NOTE: In Bizz Wizz by moving the mouse over the boxes and buttons on screen, the help box at the bottom of that screen will give you a brief description of the function of that button.
BEFORE YOU START:
In Wages,
The Super Data file can be sent without a Payment being made to the super companies
OR
Payment can be done when you send the super file, make saw your BSB and Account number is set
for the bank You wish to Pay the Super from.
Setup in the Ledger Program in settings for this bank. Help: Ledger
and scroll down to SETUP LEDGER
OZEDI SETUPS:
Ozedi is a web based third party that can send your data to the Banks and ATO
When setting up Ozedi Account for super options can be set .
Account Edit .
if no account
New Account
Back to Wages Program setups
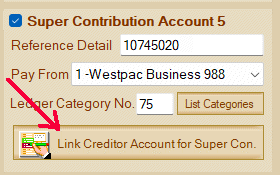
Setting Super company for Super Employer Contribution
Click shown button with red arrow
Select and press OK OR press ADD NEW button
NOTE : Reference Detail / Number Must be entered in
both options!
From edit employee screen
OR
from edit Adjustments
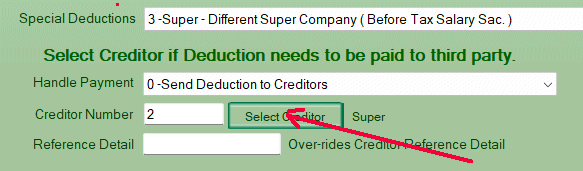
Select and press OK - OR - Press ADD NEW button
from listed Creditors
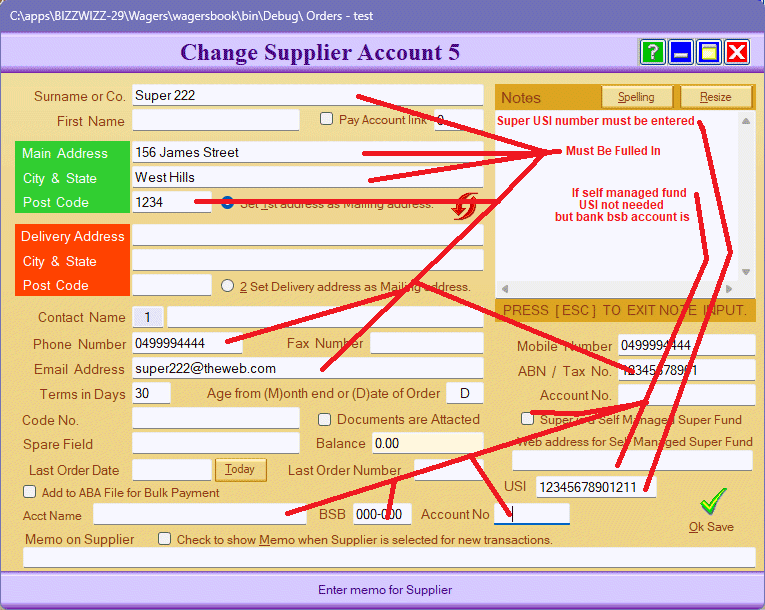
TAKE NOTE Self Managed Funds need to have some fields filled and Non Self Managed need to have others filled.
If
you are on the [Change Record] page, you can edit
the changes required for that Supplier and then click on the [Ok & Save]
button.
If you are on the [Add New Supplier Account]
page, you need to enter the details required for each description field that are
relevant for the New Supplier ONLY.
Enter the name of the Supplier .
When you tick the [Pay Account Link] field, then when you are in [Age and Pay
Creditors], all of this Suppliers Invoices will automatically be shown on the
linked account
There is two address fields, you do not need to utilise both address
fields but the first must be used. There is also the option to set the [First address] or the
[Second address] as the Mailing address.
You Must Tick on the
address that you want all corresponding mail sent to.
The two arrows button in red,
next to the first address options allows you to swap between the first address
and second address option.
Enter the rest of the detail on this Supplier, down to the ABN or Tax number
Terms in days is set at a default of 7 days. You can change this to what is
suitable for your business.
The next
area reads Age from (M)onth end or (D)ate of Invoice. If you enter D for Date,
then any Account Payable for that Supplier will automatically age after 7 days.
If you enter M for Month, then any Account Payable for that Supplier will
automatically age 7 days into the next month. There are two blank fields that
you can use as a code or spare field, that are located under the [Terms in Days]
field.
The [Account No.] field is where you enter your account number that the Supplier
has allocated to your business.
If there is no [Last Order Date] just click on the [Now] button to insert the
current date automatically.
[Tag As]
Not shown on this window will be set auto to S = Super
USI is a code that identifies the Super company for Bank and ATO .
Must be entered ( May not be needed if the super is self funded.)
Add to ABA File for bulk Payment Is not needed if the super is not
self funded.
Account name - BSB - Account No - this is the account name to receive this payment along with
the BSB and Account number ( Is not needed if the super is not self funded.)
The [Balance] field ( Is not used for creditor super funds.)
Down the bottom left of the Supplier account page, there is a field called
[Memo
on Supplier]. You can enter any memo note applicable. If you tag on [Check to
show Memo when supplier is selected for new transactions] then the Memo will
show when entering new bills. There is a box at the top right of the page for [Supplier Notes]. You can enter any notes applicable to that Supplier.
If you
click on the [Resize] button at the top of the Supplier Notes, the box will
enlarge. It will include the [Memo on Supplier] notes. You can press [ESC] to
exit the Note box or just click on any other section of that page, eg [Ok Save]
if you are ready to exit the Supplier account page.
If you tag the [Check if Documents are Attached to Supplier], then the Documents
box will be Blue in colour if there are documents for that Supplier.
The [OK & Save] button allows you to save the
information you have just entered into the New Record. If you do not [Ok &
Save] then any information you have entered or edited will not be saved.